Canon Waste Ink Tank Reset Procedures
Canon GENERIC "S" SERIES RESET CODE
Waste Ink Counter Reset.
(1) Turn off the printer.
(2) Press and hold the RESUME button, then press and hold the POWER button.
(3) Release the RESUME button, Next press and release the RESUME button two(2) more times in
succession. Note: you are still holding the POWER button). The printer's carriage will "reset"
or move momentarily. If the above was properly performed the printer will enter the
"Service Mode".
(4) Press the RESUME button 4 times, this will select the clear waste ink counter function. The lamp
will alternate (change) color with each key press.
1. Service/Factory test printout, including ink sensor check.
2. EEPROM - Info printout.
3. EEPROM - Initialization.
4. Reset the Waste ink counter.
5. Printer model setting. (More selections beyond this point - However it is best leave them unaltered - You have been warned!)
After selecting the desired mode (eg 4), press the POWER button to "set" the change, and return to the top of the function selection menu. Press the POWER button again to restart the printer.
++++++++++
Canon S9000, S300, S400, i550, i560, i850, i860, i865, i9100, i9950, PIXMA iP3000 above,
1. Turn off printer
2. Hold down Resume button and press Power button.
3. Keep holding down Power button and let Resume button go.
4. Press Resume button 2 times then let BOTH buttons go.
5. Green lights will flash and then stop blinking.
6. When green lights are solid, press the Resume button 4 times.
7. Press the Power button and the printer should turn off, if not, press the Power button once more.
8. Your printer should respond as normal.
วันพฤหัสบดีที่ 11 ธันวาคม พ.ศ. 2551
reset ip1880
reset ip1880
1. Press Resume button ( hold for 1 - 2 minutes )
2. Open the cover
3. Release the catridge and then put them on again
4. Close The Cover...
5. Turn Off, then Turn On
1. กดปุ่ม Resume ( กดค้างไว้ 1 - 2 นาที )
2. เปิดฝา
3. ถอดตลับแล้วใส่ใหม่
4. ปิดฝา
5. ปิดเครื่องแล้วเปิดเครื่องใหม่
1. Press Resume button ( hold for 1 - 2 minutes )
2. Open the cover
3. Release the catridge and then put them on again
4. Close The Cover...
5. Turn Off, then Turn On
1. กดปุ่ม Resume ( กดค้างไว้ 1 - 2 นาที )
2. เปิดฝา
3. ถอดตลับแล้วใส่ใหม่
4. ปิดฝา
5. ปิดเครื่องแล้วเปิดเครื่องใหม่
วันเสาร์ที่ 29 พฤศจิกายน พ.ศ. 2551
วิธีการ HP Maintenance Reset Methods
วิธีการ HP Maintenance Reset Methods

HP IIISi Printers:
1. Press ONLINE until the light goes off
2. Hold down MENU until PCL CONFIG MENU appears
3. Press the MENU key until SERVICE MSG=ON* appears
4. Press the + or - key to change display to SERVICE MSG=OFF
5. Press ENTER/RESET MENU key to turn message off, the * should appear, then press ONLINE
HP 4Si Printers:
1. Press ONLINE until the light goes off
2. Press MENU until CONFIG MENU appears
3. Press the ITEM key until SERVICE MSG=ON* appears
4. Press the + or - key to change display to SERVICE MSG=OFF
5. Press the ENTER key to turn message off, the * should appear, then press ONLINE
HP 5Si:
1. Press MENU key 4 times for CONFIG MENU
2. Press ITEM to display SERVICE MESSAGE=OFF
3. Press ENTER
4. Press ONLINE
HP 4000/4050/4100/5000 Printers:
1. Turn the printer off
2. Hold down the left side of the ITEM and VALUE +/- keys, turn the printer on and wait
until RESET MAINTENANCE COUNT is displayed and then release the keys
HP 4500/4550 Printers:
1. Turn the printer off
2. Hold down the CANCEL JOB and SELECT keys and turn the printer on, then wait until the display goes blank and the three LED's come on
3. Press the right side of the MENU key, then press the SELECT key
4. You will enter SERVICE MODE after the normal test completes
5. Press the ITEM key until the FUSER MAINTENANCE COUNT appears
6. Press VALUE +/- to change to zero
7. Press SELECT to save
8. Press GO; the printer should return to READY
HP 8000/8100/8150 Printers:
1. Press the MENU button until the display reads CONFIGURATION MENU
2. Press the ITEM button until the display reads SERVICE MESSAGE = ON/OFF
3. Select OFF*
4. Press SELECT to save
5. Turn printer off
6. Hold the VALUE MINUS and ITEM MINUS buttons while turning the printer back on Hold buttons down until display reads RESET MAINT/COUNTand then release both buttons
HP 9000 Printers:
1. Turn the printer off
2. Press and hold the CHECK key
3. Power on the printer
4. Release the CHECK key after all three lights come on The display should read SELECT LANGUAGE
5. Press the up arrow until MAINTENANCE KIT is displayed, then press the CHECK key again and the maintenance kit count has been reset
HP Color LaserJet 4500/4550 Printers (TRANSFER KIT RESET):
1. Press the MENU button until the RESETS MENU is displayed
2. Press the ITEM button until TRANSFER KIT SELECT IF DONE is displayed
3. Press the SELECT button
HP Color LaserJet 4500/4550 Printers (FUSER KIT RESET):
1. Press the MENU button until the RESETS MENU is displayed
2. Press the ITEM buton until FUSER KIT SELECT IF DONE is displayed
3. Press the SELECT button
4. Press the GO button to return to READY
HP Color LaserJet 4600 Printer (IMAGE TRANSFER KIT (ETB) RESET):
1. After Maintenance is performed, the display should read NEW TRANSFER KIT =
2. Press the down arrow to highlight YES, then press the CHECK button to reset Or enter CONFIGURE DEVICE in menus, choose RESETS then RESET SUPPLIES, choose NEW TRANSFER KIT and select
HP Color LaserJet 4600 Printer (FUSER KIT RESET):
1. After Maintenance is performed, the display should read NEW FUSER KIT =
2. Press the down arrow to highlight YES, then press the CHECK button to reset Or enter CONFIGURE DEVICE in menus, choose RESETS then RESET SUPPLIES, choose NEW FUSER KIT and select
HP Color LaserJet 8500/8550 Printers (TRANSFER KIT RESET):
1. Press the MENU button until the RESETS MENU is displayed
2. Press the ITEM button until RESET TRANSFER LIFE COUNT is displayed
3. Press the SELECT button to reset, then GO to return to READY
HP Color LaserJet 8500/8550 Printers (FUSER KIT RESET):
1. Press the MENU button until the RESETS MENU is displayed
2. Press the ITEM buton until RESET FUSER LIFE COUNT is displayed
3. Press the SELECT button to reset
http://www.thaiinkshop.com บทความน่าอ่าน HPบทความน่าอ่าน Canon
บทความน่าอ่าน Canon

กรณีเครื่องแจ้งแผ่นซับหมึกเต็ม
Canon MPC190
Reset Waste Ink
1) Enter SERVICE MODE.
By pressing Menu Copy Scan Copy Copy
2) Select TEST MODE.
3) Select [8] PRINTER TEST in TEST MODE.
4) Select 3. [EEPROM CLEAR].
5) Select 0. [INK COUNT].
6) Press the [Set] key.
7) Press the [Stop/Reset] key (returning to the state of 3)), and then press the [ON/OFF] key
บทความน่าอ่าน Brother
บทความน่าอ่าน Brother
Brother
รุ่น DCP315C 310CN 120C 115C 117C 110C
วิธีทำ
1.ถอดปลั๊ก กดปุ่ม Menu ค้างไว้ แล้วเสียบปลั๊ก รอจนหน้าจอขึ้นคำว่า Maintanance แล้วปล่อยมือ
2. กด 80 โดยใช้ลูกศรเลื่อนเหมือนเดิมครับ อย่าลืมกด Set ระหว่างตัวด้วยครับ
3. กด Mono Start ไปเรื่อยๆ หาคำว่า Purge : XXXX
4. กด 2783 โดยใช้วิธีกดลูกศรเลื่อนขึ้นเหมือนเดิม อย่าลืมกด Set ระหว่างตัวด้วยครับ
5. ตัว Purge : 0000 จะกลายเป็นศูนย์ทั้งหมด แล้วกด Stop
6. กด 99 โดยใช้วิธีกดลูกศรเลื่อนขึ้นเหมือนเดิม อย่าลืมกด Set ระหว่างตัวด้วย
คงพอทราบกันแล้วนะครับ เทคนิคเหล่านี้ต้องเข้าใจเรื่องหลักการพริ้นเตอร์บ้างจึงจะใช้ให้เกิดประโยชน์สูงสุด
ปล. มีเพิ่อนๆ อาชีพเดียวกับผม (ผมเป็นช่างคอมพ์) ว่า "ทำไมเอาของหากินมาโพสบนเน็ตแบบนี้ เก็บไว้รู้คนเดียวคอยหาตังไม่ดีกว่าหรอ" ผมตอบได้เลยว่า "ที่ เป็นช่างคอมพ์ดังเช่นทุกวันนี้ก็เพราะได้ความรู้การแบ่งปันจากเน็ต ไม่มีเน็ตก็ไม้รู้ขนาดนี้" ผมคิดเสมอว่าความรู้เรื่องคอมพิวเตอร์มันเกิดตลอดเวลา เราศึกษาสิ่งใหม่ๆ ไปพร้อมเผยแพร่สิ่งที่เรารู้แล้ว
วิธีเคลียร์ตลับหมึกพริ้นเตอร์ Epson
Epson
รุ่น C58 C79 C90 C110 CX2800 CX3900 CX5500 CX5900 R240 R245 R250 R270 R350 R390 R800 RX630 RX650
พริ้นเตอร์ Epson จะใช้โปรแกรมเข้าช่วยแล้วก็วิธีจะคล้าย ๆ กัน
ดาวน์โหลดโปรแกรมที่นี่
วิธีทำ
1. เปิดเครื่อง
2. Run ไฟล์ INDORESET.BAT
- set วันที่ของเครื่องให้ตรงกับโปรแกรมโดยดูรุ่น+วันที่ในโปรแกรม เช่น C58_9-11-2006 ก็ set วันที่ในเครื่องให้ตรงกัน
- set วันที่ให้เหมือนรุ่นที่ต้องการเคลียโดยดูในโปรแกรม เหมือนข้อข้างต้น
3. run ไฟล์ adjprog.exe
4. click accept
5. click particular adjustment mode
6. ไปที่หัวข้อ maintenance เลือก waste ink pad counter click ok
7. click initialization แล้วก็ click on ปุ่ม finish
8. ปิดเครื่องแล้วเปิดใหม่เป็นอันเสร็จ
*ถ้าไม่ทำตามข้อ 2 โปรแกรมจะล็อค วิธีแก้ล็อคคือ
1. ลบ adjustment program folder ใน C:\
2. RUN คำว่า "regedit"
3. เข้าไปใน HKEY_LOCAL_MACHINE\SOFTWARE\EPSON\PTSG\ แล้วลบรุ่นที่ต้องการ
ส่วนรุ่นอื่น ๆ หรือรุ่นเก่า ๆ ก็ใช้โปรแกรม SSC Service Tool ช่วยได้ครับ ดาวน์โหลดโปรแกรมที่นี่
Brother
รุ่น DCP315C 310CN 120C 115C 117C 110C
วิธีทำ
1.ถอดปลั๊ก กดปุ่ม Menu ค้างไว้ แล้วเสียบปลั๊ก รอจนหน้าจอขึ้นคำว่า Maintanance แล้วปล่อยมือ
2. กด 80 โดยใช้ลูกศรเลื่อนเหมือนเดิมครับ อย่าลืมกด Set ระหว่างตัวด้วยครับ
3. กด Mono Start ไปเรื่อยๆ หาคำว่า Purge : XXXX
4. กด 2783 โดยใช้วิธีกดลูกศรเลื่อนขึ้นเหมือนเดิม อย่าลืมกด Set ระหว่างตัวด้วยครับ
5. ตัว Purge : 0000 จะกลายเป็นศูนย์ทั้งหมด แล้วกด Stop
6. กด 99 โดยใช้วิธีกดลูกศรเลื่อนขึ้นเหมือนเดิม อย่าลืมกด Set ระหว่างตัวด้วย
วิธีเคลียร์ตลับหมึกพริ้นเตอร์ Canon
Canon
รุ่น IP3000 IP4200 หรือรุ่นที่คล้ายกัน
สิ่งนี้ช่วยให้คุณเข้าใจบทความยิ่งขึ้น
ผ้าซับหมึกเต็ม ไฟจะกระพิบสลับ
วิธีทำ
1.ปิดเครื่อง
2.กดปุ่ม Resume ค้างไว้ และตามด้วยปุ่ม ON/OFF ค้างตาม
3.ในขณะที่ยังกดปุ่ม ON/OFF ค้างอยู่ ให้ปล่อยมือจากปุ่ม Resume
4.ยังกดปุ่ม ON/OFF ค้างอยู่ ให้กดปุ่ม Resume อีก 2 ครั้ง เสร็จแล้วปล่อยมือจากปุ่มทั้ง 2 ปุ่ม
5.ไฟสีเขียวจะกระพริบสักพักแล้วจะหยุด
6.เมื่อไฟกลายเป็นสีเขียวค้าง กดปุ่ม Resume 4 ครั้ง
7.กดปุ่ม ON/OFF เพื่อปิดปริ๊นท์เตอร์ (บางทีอาจต้องกด 2 ครั้ง เพื่อปิด)
8.เปิดปริ๊นท์เตอร์ ก็จะใช้งานได้ตามปกติ
9. ให้นำผ้าซับหมึกออกมาล้างก่อน แต่จำเป็นต้องถอดประกอบ (ใช้ตอนหมึกเสียล้นออกมานอกเครื่อง ไม่จำเป็นก็ไม่ต้องฝืนครับไม่งั้น...เศร้า)
รุ่น MP150 MP160 หรือรุ่นที่คล้ายกัน
สิ่งนี้ช่วยให้คุณเข้าใจบทความยิ่งขึ้น
ผ้าซับหมึกเต็ม
วิธีทำ
1. ปิดเครื่อง
2. กดปุ่ม Stop/Reset ค้างไว้ และตามด้วยปุ่ม ON/OFF ค้างตาม
3. ในขณะที่ยังกดปุ่ม ON/OFF ค้างอยู่ ให้ปล่อยมือจากปุ่ม Stop/Reset
4. ยังกดปุ่ม ON/OFF ค้างอยู่ ให้กดปุ่ม Stop/Reset อีก 2 ครั้ง เสร็จแล้วปล่อย มือจากปุ่มทั้ง 2 ปุ่ม
5. ไฟสีเขียวจะกระพริบสักพักแล้วจะหยุด
6. เมื่อไฟกลายเป็นสีเขียวค้าง กดปุ่ม Stop/Reset 4 ครั้ง
7. กดปุ่ม ON/OFF เพื่อปิดปริ๊นท์เตอร์ (บางทีอาจต้องกด 2 ครั้ง เพื่อปิด)
8. เปิดปริ๊นท์เตอร์ ก็จะใช้งานได้ตามปกติ
9.เหมือน IP300 IP4200
อาการไฟค้างตรง Black/Color เวลาใส่ตลับหมึกแบบเติม
วิธีทำ
1.กอดปลั๊ก เครื่องพิมพ์ออก
2.กดปุ่ม Power ค้างไว้
3.เสียบปลั๊กเครื่องพิมพ์
4.กดปุ่ม Stop/Reset 2 ครั้ง ปล่อยปุ่ม Power
5.หน้าจอจะขึ้นเลข “ 0 ” กดปุ่ม “ + ” 1 ครั้ง หน้าจอจะขึ้นเลข “ 1 ”
6.กดปุ่ม Star Color 2 ครั้ง และกดปุ่ม Power 1 ครั้ง รอกระดาษ Test ออกมา 2 แผ่น
7.เปิดฝาเครื่องพิมพ์ รอหัวพิมพ์เลื่อนมาทางซ้าย กอดปลั๊กออก และถอดตลับหมึกออกทั้งดำและสี
8.ปิดฝาเครื่องพิมพ์ เสียบปลั๊ก แล้วเปิดเครื่อง (กดปุ่ม Power)
9.เครื่องจะเรียกหาตลับหมึก ให้เปิดฝาเครื่องแล้วใส่ตลับหมึกทั้งสอง ปิดฝาหน้าจอขึ้นเลข 1 OK. พร้อมใช้งาน
*จะทำก็ต่อเมื่อเครื่องไม่ฟ้อง Error หรือไฟ Alarm ค้าง
ต่อไปเป็นวิธีเคลียค่า error แบบอื่นๆ ของพริ้นเตอร์ Canon ใช้ได้เกือบทุกรุ่น
1.ขณะที่ ปริ้นเตอร์ปิดเครื่องอยู่นั้น ให้กดปุ่ม Resume ค้างไว้ แล้วมากดปุ่ม power ค้างไว้อย่าปล่อย จะมีไฟเขียวปรากฏขึ้น
2.ยังคงค้างปุ่ม power ไว้ แล้วปล่อยปุ่ม Resume
3.ขณะที่ยังคงค้างปุ่ม power ไว้ ให้กดปุ่ม resume 2 ครั้ง และปล่อยปุ่มทั้งคู่ออก
4.เมื่อไฟสัญญาณ power เป็นสีเขียวแล้วให้ กดปุ่ม resume เป็นจำนวนครั้ง
เพื่อเหตุผลต่อไปนี้
1 ครั้ง ไฟส้ม คือ Service test print (พริ้นทดสอบ)
2 ครั้ง ไฟเขียว คือ EEPROM information print (พริ้นสถานะของ EEPROM)
3 ครั้ง ไฟส้ม คือ EEPROM Initialization (การเริ่มต้นค่าปฎิบัติการ EEPROM)
4 ครั้ง ไฟเขียว คือ Waste Ink Counter Resetting (เคลียร์ค่าแผ่นซับหมึก)
5 ครั้ง คือ ไฟส้ม คือ Destination setting (การเข้าเมนูการปรับแต่งตั้งค่าต่างๆ)
6 ครั้ง ไฟเขียว คือ Print head deep cleaning (ล้างหัวพิมพ์ทั้งดำและสี)
7 ครั้ง ไฟส้ม คือ Reserved
8 ครั้ง ไฟเขียว คือ CD/DVD check pattern (ตรวจสอบรูปแบบการพริ้นซีดี)
9 ครั้ง ไฟส้ม คืด CD/DVD print position correct (พริ้นตำแหน่งการพิมพ์ของซีดีในแกนแนวนอน)
10 ครั้ง คือ ไฟเขียว CD/DVD print position correct (พริ้นตำแหน่งการพิมพ์ของซีดีในแกนแนวตั้ง)
11 ครั้ง ถึง 13 ครั้ง ไฟ ส้ม เขียว ส้ม Return to menu selection (กลับไปสู่เมนูหลัก)
14 ครั้ง ไฟเขียว Left margin correct (ปรับแต่งขอบการพิมพ์ด้านซ้าย)
15 ครั้ง ไฟส้ม Return to menu selection (กลับไปสู่เมนูหลัก)
วิธีเติมหมึก Canon ตลับ #5 #8
วิธีเติมหมึก Canon ตลับ #5 #8
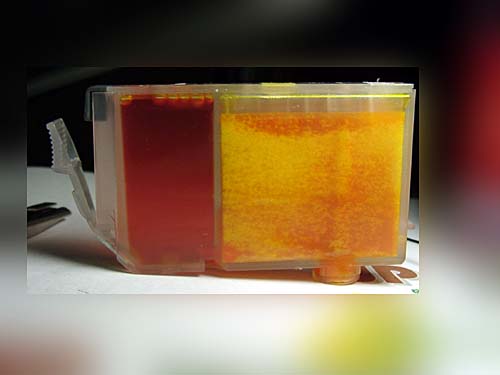
ตลับหมึกรุ่นนี้จะแบ่งเป็น 2 ส่วนครับ1. ส่วนที่มีฟองน้ำ (ห้องใหญ่)
2. ส่วนที่เป็นห้องเก็บน้ำหมึก (ห้องเล็ก)
ปกติที่เห็นโดยทั่วไป วิธีเติมหมึกจะเจาะด้านบนของห้องเก็บน้ำหมึก
เติมหมึกเข้าไปแล้ว seal ด้วยปืนกาว หรืออาจจะขันน๊อตปิดไม่ให้อากาศเข้าได้
ซึ่งถ้า seal ไม่ดี หรือ เวลาเติมหมึกครั้งใหม่ก็ต้องเปิดรูแล้ว seal ใหม่อยู่เรื่อย
อาจมีปัญหาอากาศรั่วเข้าไปได้ หมึกก็จะไหลท่วมเครื่องเสียหายได้
อย่ากระนั้นเลย มาลองใช้วิธีเติมหมึกโดยไม่ต้อง seal ให้ยุ่งยาก
หมึกหมดก็แค่ถอดตลับมาเสียบเข็มฉีดหมึกให้เต็ม ง่ายจะตายไป
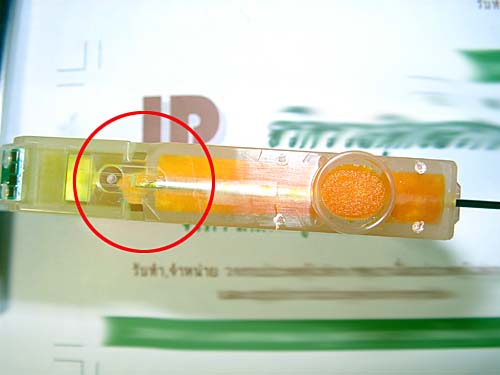
นี่ครับโฉมหน้าตลับ Canon เบอร์ 8 เบอร์ 5
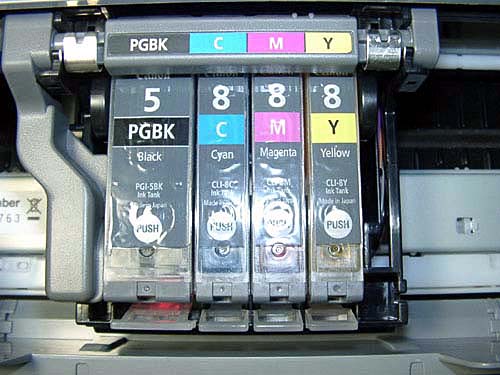
คัดนายแบบออกมา 1 นาย ขอเป็นสีเหลืองล่ะกัน
ทุกครั้งที่จะถอดตลับให้ตัดไฟก่อนครับ ไม่งั้นตัวชิปเสียหน้ามืด
1. เปิดฝาให้ตลับเลื่อนมาพร้อมถอด แต่ .. อย่าเพิ่งถอด
2. ดึงปลั๊กไฟออกแกล้งไฟดับ แล้วค่อยถอดตลับออกมา
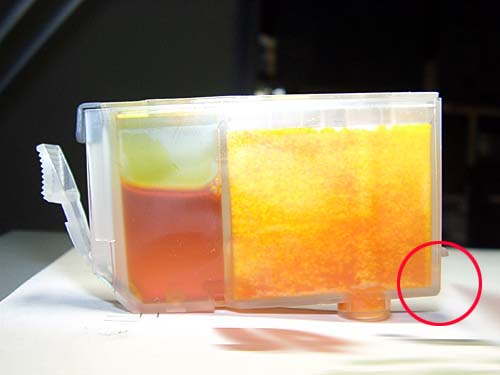
ตรงวงกลมสีแดง คือ ส่วนที่เราจะทำการเจาะรูเพื่อเติมหมึกครับ
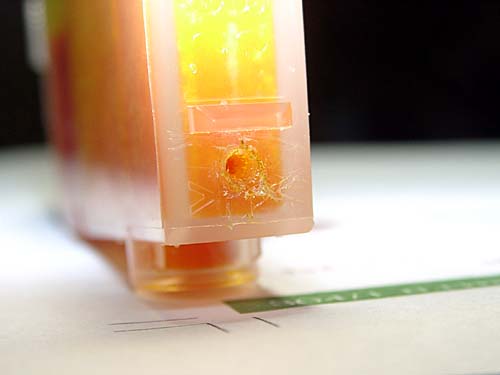
นี่ไง เจาะรูเรียบร้อยแล้ว
ผมใช้หัวแร้งบัดกรีจี้นำเป็นรูเล็ก ๆ แล้วค่อยเอาไขควงซ่อมนาฬิกาอันเล็กคว้านให้ใหญ่
แหะ..แหะ.. ถ้าฟังดูซับซ้อน ก็ใช้สว่านเจาะ หรือทำยังไงก็ได้ให้ได้รูขนาดเข็มฉีดยาเสียบเข้าไปได้
อุปกรณ์สำคัญที่จำเป็นต้องมี คือ เข็มฉีดยาขนาด 3-4 นิ้ว
หาซื้อได้ตามร้านขายยาชั้นนำทั่วไป (ร้านขายยาเล็ก ๆอาจไม่มีขายครับ)
ที่ต้องยาวเพราะต้องเสียบเข้าไปให้ถึงห้องที่เก็บน้ำหมึกครับ
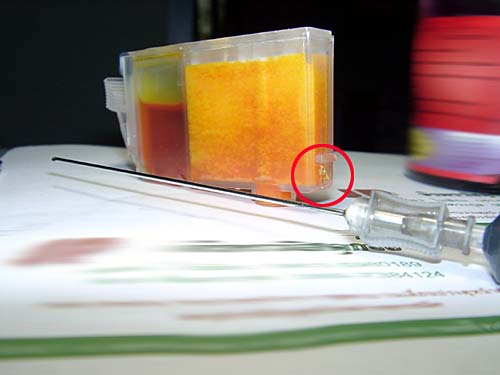
เสียบเข้ามาแล้ว
เห็นหัวเข็มทะลุฟองน้ำเข้าไปยังห้องเล็กที่เก็บน้ำหมึก
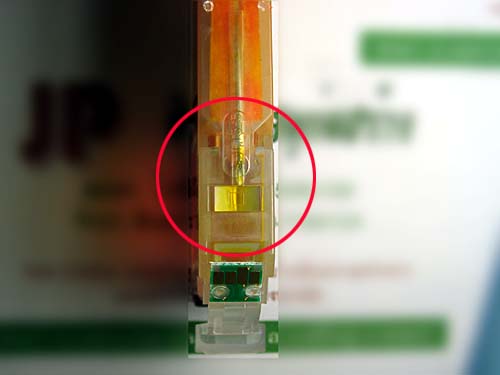
อีกรูป ชัด ๆ
เรียบร้อยครับพี่น้อง
หมึกเต็มสมใจนักเติมหมึก
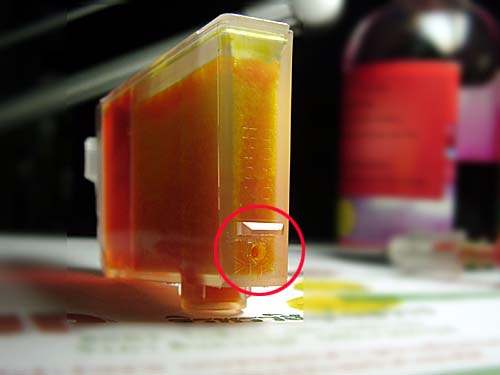
โอ้ ... รูเติมไม่ต้อง seal ให้ยุ่งยาก
หมึกไม่รั่วออกมาอยู่แล้ว ฟองน้ำอุ้มน้ำหมึกไว้
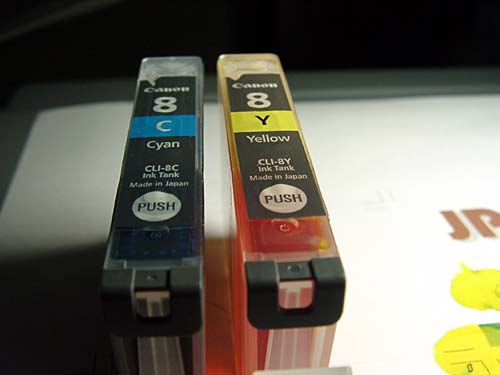
สภาพตลับเดิม ๆครับพี่น้อง
ไม่ต้องไปแกะสติ๊กเกอร์ เจาะ ๆซีล ๆให้วุ่นวายเหมือนก่อน
== แถมท้าย ==
สำหรับผู้ที่ไม่อยากเจาะตลับวุ่นวาย ก็ให้ใช้วิธีหยดหมึกติ๋ง ๆลงไปบนฟองน้ำกลมโดยตรงก็ได้ครับ
(หงายตลับขึ้นมา ตรงช่องหมึกออกนั่นล่ะ จะเห็นช่องกลม ๆและฟองน้ำ)
แต่จะเติมหมึกได้แค่เต็มฟองน้ำเท่านั้น ไม่สามารถเติมหมึกที่ห้องเล็กเก็บน้ำหมึกได้
เวลาเติมอย่าให้เข็มฉีดยาไปโดนฟองน้ำจนเสียรูปล่ะ
สำหรับผู้ที่หาซื้อเข็มฉีดยายาว 3-4 นิ้วไม่ได้
ก็ลองเจาะรูด้านข้าง หรือด้านล่างของตลับ ให้ใกล้ ๆกับห้องเล็กก็ได้
หลักการคือ เข็มต้องแทงทะลุฟองน้ำก่อนเข้าห้องเล็ก ฟองน้ำจะช่วยกันไม่ให้หมึกไหลออกมาครับ
จากbloggang
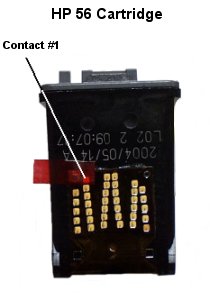
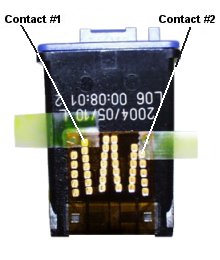
วิธี Reset ตลับหมึก HP
วิธี Reset ตลับหมึก HP
ปกติเวลาถอดตลับหมึกออกจากเครื่องพิมพ์ยี่ห้อ HP ต้องตัดไฟก่อนครับไม่งั้นเครื่องพิมพ์จะจำ ID ของตลับหมึกไว้
หากไม่ตัดไฟก่อนถอดตลับ พอถอดเข้า ๆออก ๆไม่กี่รอบขึ้นไฟแดงไม่รับตลับหมึก
อย่าเพิ่งตกใจครับพี่น้อง ตลับไม่ได้เสีย ลองเอาไปใส่เครื่องอื่นใช้งานได้ฉลุย
แต่ถ้าจะใช้กับเครื่องเดิม ต้อง Reset ครับ โดยมีขั้นตอนดังนี้
สำหรับตลับสีดำ (เบอร์ 21, 27, 56, 58)
1. ถอดตลับออกมาติด เทปตรงปุ่มทองแดง #1
2. ใส่ตลับเข้าเครื่องพิมพ์ เครื่องขึ้นไฟแดงไม่รับตลับหมึก
3. ถอดตลับออกมาติดเทปตรงปุ่มทองแดง #2 (ปุ่ม #1ก็ติดเทปอยู่ยังไม่ต้องแกะออก)
4. ใส่ตลับเข้าเครื่องพิมพ์ เครื่องขึ้นไฟแดงไม่รับตลับหมึก
5. ถอดตลับออกมา แกะเทป #1 #2 ออก
6. ใส่ตลับเข้าเครื่องพิมพ์ OK พร้อมใช้งาน

สำหรับตลับสี (เบอร์ 22, 28, 57)
1. ถอดตลับออกมาติด เทปตรงปุ่มทองแดง #1
2. ใส่ตลับเข้าเครื่องพิมพ์ เครื่องขึ้นไฟแดงไม่รับตลับหมึก
3. ถอดตลับออกมาติดเทปตรงปุ่มทองแดง #2 (ปุ่ม #1ก็ติดเทปอยู่ยังไม่ต้องแกะออก)
4. ใส่ตลับเข้าเครื่องพิมพ์ เครื่องขึ้นไฟแดงไม่รับตลับหมึก
5. ถอดตลับออกมา แกะเทป #1 #2 ออก
6. ใส่ตลับเข้าเครื่องพิมพ์ OK พร้อมใช้งาน

http://www.bloggang.com
วิธีเคลียร์ซับหมึก Canon MP145 , Canon MP160
วิธีเคลียร์ซับหมึก Canon MP145 , Canon MP160
1. ปิดเครื่อง
2. กดปุ่ม Stop/Reset ค้างไว้ และตามด้วยปุ่ม ON/OFF ค้างตาม
3. ในขณะที่ยังกดปุ่ม ON/OFF ค้างอยู่ ให้ปล่อยมือจากปุ่ม Stop/Reset
4. ยังกดปุ่ม ON/OFF ค้างอยู่ ให้กดปุ่ม Stop/Reset อีก 2 ครั้ง เสร็จแล้วปล่อยมือจากปุ่มทั้ง 2 ปุ่ม
5. รอจนเป็นเลข 0
6. กดปุ่ม Stop/Reset 4 ครั้ง
7. กดปุ่ม ON/OFF เพื่อปิดปริ๊นท์เตอร์ (บางทีอาจต้องกด 2 ครั้ง เพื่อปิด)
8. เปิดปริ๊นท์เตอร์ ก็จะใช้งานได้ตามปกติ
mp145 ขึ้น E8
CANNON Printers MP150/MP160 ERROR CODE
E2-2 No paper (ASF)
E3-3 Paper jam
E4 No ink
E5-5 The ink cartridges are not installed or a non-supported ink cartridge is installed ,
or the ink cartridges are not installed properly
E8 Waste ink absorber full, or platen waste ink absorber full
CANNON Printers MP150/MP160 ERROR CODE
E9 The connected digital camera / video camera does not support Camera
Direct Printing
E14 The Ink cartridges whose destination are wrong
E15 Ink cartridge is not installed E16 - Ink remaining is unknown
E16 -E19 Failed to scan head alignment sheet
E22 Carriage error
E23 Paper feed error
E24 Purge unit error
E25 ASF(cam) sensor error
E26 Internal temperature rise error
E27 Waste ink absorber full or platen waste ink absorber full
E28 Ink cartridge temperature rise error -
E29 EEPROM error
E33 Paper feed position error
E35 15 USB Host VBUD overcurrent error - USB
E37 17 Abnormal motor driver error
E40 20 Other hardware error
E42 22 Scanner error"
ที่มา
http://www.coldreset.com/modules.php?name=News&file=article&sid=119
เครื่องพิมพ์ (Printer)
เครื่องพิมพ์ (Printer)
เครื่องพิมพ์ เป็นอุปกรณ์ที่ต่อเข้ากับคอมพิวเตอร์โดยผ่านพอร์ตขนานที่มีขนาด 25 พิน เพื่อทำหน้าที่แสดงผลที่ได้จากการ ประมวลผลของเครื่องคอมพิวเตอร์ให้อยู่ในรูปของอักษร หรือรูปภาพที่จะไปปรากฏอยู่บนกระดาษ เครื่องพิมพ์แบ่งออกเป็น 4 ประเภท1. เครื่องพิมพ์ดอตแมทริกซ์ (Dot Matrix Printer)

เครื่องพิมพ์ดอตแมทริกซ์นี้ใช้หลักการสร้างจุด ลงบน กระดาษโดยตรง หัวพิมพ์ของเครื่องพิมพ์ มีลักษณะเป็นหัวเข็ม (pin) เมื่อต้องการพิมพ์สิ่งใดลงบนกระดาษ หัวเข็มที่อยู่ในตำแหน่งที่ประกอบกันเป็น ข้อมูลดังกล่าวจะยื่นลำหน้าหัวเข็มอื่น เพื่อไปกระแทกผ่านผ้าหมึก ลงบนกระดาษ ก็จะทำให้เกิดจุดความคมชัดของข้อมูลบน กระดาษขึ้นอยู่กับจำนวนจุด ถ้าจำนวนจุดยิ่งมากข้อมูลที่พิมพ์ลงบนกระดาษก็ยิ่งคมชัดมากขึ้น เครื่องพิมพ์ดอตแมทริกซ์ เหมาะสำหรับงานที่พิมพ์แบบฟอร์มที่ต้องการซ้อนแผ่นก๊อปปี้ หลาย ๆ ชั้น เครื่องพิมพ์ชนิดนี้ ใช้กระดาษต่อเนื่องในการพิมพ์ เครื่องพิมพ์ชนิดนี้จะยัง คงมีใช้อยู่ตามองค์กรราชการ
 2. เครื่องพิมพ์แบบพ่นหมึก (Ink-Jet Printer)
 เครื่องพิมพ์พ่นหมึก สามารถพิมพ์ตัวอักษรที่มีรูปแบบ และขนาดที่แตกต่างกันมาก ๆ รวมไปถึง พิมพ์งานกราฟิกที่ให้ผลลัพธ์ คมชัดกว่าเครื่องพิมพ์ดอตแมทริกซ์ เทคโนโลยีที่เครื่องพิมพ์พ่นเป็น การพ่นหมึกหยดเล็ก ๆ ไปที่กระดาษ หยดหมึกจะมีขนาดเล็กมาก แต่ละจุดจะอยู่ในตำแหน่งที่เมื่อประกอบกันแล้วจะเป็นตัวอักษร หรือรูปภาพตามความต้องการ การพิมพ์แบบนี้จะพิมพ์แบบซ้อนแผ่นก๊อปปี้ไม่ได้ แต่มีความสามารถพิมพ์ได้รวดเร็วและเสียงไม่ดัง มีหน่วยวัดความเร็วเป็นในการพิมพ์เป็นหน้าต่อนาที PPM (Page Per Minute) ความสามารถของเครื่องพิมพ์ประเภทนี้ถูกพัฒนามาให้มีประสิทธ์ขึ้นเลื่อยๆ นั้นขึ้นอยู่กับการใช้งาน แต่ต้องมีกระดาษที่ใช้พิมพ์เป็นปัจจัยด้วยเช่นกัน ณ ปัจจุบัน(2545)ความสามารถของเครื่องพิมพ์น้นสูงสุดถึง 4800x1200 dpi (Dot per inch)
3. เครื่องพิมพ์เลเซอร์ (Laser Printer)

เครื่องพิมพ์ชนิดนี้อาศัยเทคโนโลยีไฟฟ้าสถิตย์เบบเดียวกันกับเครื่อง ถ่ายเอกสารทั่วไปโดยลำแสง จากไดโอดเลเซอร์จะฉายไปยังกระจกหมุน เพื่อสะท้อนไปยังลูกกลิ้งไวแสง ซึ่งจะปรับตามสัญญาณภาพหรือตัวอักษรที่ได้รับจากคอมพิวเตอร์ และกวาดตามแนวยาวของลูกกลิ้งอย่างรวดเร็ว สารเคลือบที่อยู่บนลูกกลิ้งจะ ไปทำปฎิกิริยากับแสงแล้วเปลี่ยนเป็นประจุไฟฟ้าสถิตย์ ซึ่งทำให้ผงหมึกเกาะติดกับพื้นที่ที่มีประจุ เมื่อกระดาษพิมพ์หมุนผ่านลูกกลิ้ง ความร้อนจะทำให้ผงหมึกหลอมละลาย ติดกับกระดาษได้ภาพหรือตัวอักษร เนื่องจากลำแสงเลเซอร์ได้รับการควบคุมอย่างถูกต้อง ทำให้ความละเอียดของจุดภาพบนกระดาษสูงมาก งานพิมพ์จึงมีคุณภาพสูงทำให้ได้ภาพ และตัวหนังสือที่คมชัดสวยงาม การพิมพ์ของเครื่องพิมพ์เลเซอร์เสียงจะไม่ดัง
4. พล็อตเตอร์ (plotter)

พล็อตเตอร์ เป็นเครื่องพิมพ์ชนิดที่ใช้ปากกาในการเขียนข้อมูลต่างๆ ลงบนกระดาษที่ทำมาเฉพาะงานเหมาะสำหรับงานเกี่ยวกับการเขียนแบบทางวิศวกรรม และงานตกแต่งภายใน ใช้สำหรับวิศวกรรมและสถาปนิก พล็อตเตอร์ทำงานโดยใช้วิธีเลื่อนกระดาษ โดยสามารถใช้ปากกาได้ 6-8 สี ความเร็วในการทำงานของ พล็อตเตอร์มีหน่วยวัดเป็นนิ้วต่อวินาที (Inches Per Second : IPS) ซึ่งหมายถึงจำนวนนิ้วที่พล็อตเตอร์สามารถ เลื่อนปากกาไปบนกระดาษ
กระดาษที่ใช้พิมพ์
กระดาษที่ใช้พิมพ์นั้นจะถูกเรียกตามนำหนักเช่น 70 แกรมนั้นคือ 70 เป็นแกรมต่อตารางเมตรซึ่งสามารถแบ่งได้ตามการใช้งานดังนี้
- Plain Paper เป็นกระดาษทั่วไปที่มีตามร้านเครื่องเขียน มีขนาดที่นิยมใช้ คือ 70 หรือ 80 แกรม
- กระดาษมัน Glossy Paper เป็นกระดาษมัน มีขนาดเริ่มต้นที่ 90 แกรม รองรับการพิมพ์ที่ 1440 dpi - 2880 dpi โดยน้ำหมึกจะไม่ซึมไปด้านหลังกระดาษ
- กระดาษแบบด้าน Matte Finish Paper ไว้สำหรับพิมพ์ภาพกราฟฟิก มีคุณสมบัติกันน้ำ ไม่สะท้อนแสง
- กระดาษโฟโต้ Photo Paper ใช้กับการพิมพ์ภาพถ่ายที่มาจากกล้องดิจิตอล มีความหน้าและกันน้ำได้ รองรับความระเอียดถึง 2880 dpi
วันอังคารที่ 21 ตุลาคม พ.ศ. 2551
สรุปการ ทดสอบตัวเอง (Self Test)
เครื่องพิมพ์อิ้งค์เจ็ท (Ink Printer) Canon รุ่นมีปุ่มควบคุม 2 หรือ 3 ปุ่ม ให้ปฏิบัติดัง
1 เปิดเครื่องพิมพ์ (On Power) รอให้เครื่อง Ready (พร้อมที่จะทํ างาน ไฟแสดงผลจะมีสีเขียวติดค้าง)
2 กดปุ่ม Feed ค้างไว้ รอไว้แสดงผลสีเขียวกระพริบ
- ถ้ากระพริบครั้งหนึ่งแล้วปล่อยจะเป็นการล้างหัวพิมพ์ (Head Cleaning)
* - ถ้ากระพริบครั้งที่สองแล้วปล่อยจะเป็นการ Self Test
- ถ้ากระพริบครั้งที่สามแล้วปล่อยจะเป็นการ ฟีดกระดาษ (Paper Feed) เพื่อ
Canon 1 ปุ่ม ให้ปฏิบัติดังนี้
1 เิปิดเครื่องพิมพ์ (On Power) รอให้เครื่อง Ready พร้อมที่จะทํ างาน
2 กดปุ่มสองครั้งติดต่อการ (ทํ าเหมือนดับเบิลคลิ้กเมาท์)
สรุปการ ทดสอบตัวเอง (Self Test)
เครื่องพิมพ์อิ้งค์เจ็ท (Ink Printer) HP รุ่นมีปุ่มควบคุม 2 ปุ่มเช่นรุ่น HP Desk jet 6xx,7xx,8xx,9xx ให้ปฏิบัติดังนี้
วิธีที่ 1
1 เปิดเครื่องพิมพ์ (On Power) รอให้เครื่อง Ready (พร้อมที่จะทํ างาน ไฟแสดงผลจะมีสีเขียวติดค้าง)
2 กดปุ่ม Feed ค้างไว้ รอ จะได้ยินเสียงกลไกทํ างานแล้วปล่อยวิธีที่ 2
1 เปิดเครื่องพิมพ์ (On Power) รอให้เครื่อง Ready (พร้อมที่จะทํ างาน ไฟแสดงผลจะมีสีเขียวติดค้าง)
2 กดปุ่ม Power ค้างไว้ แล้วตามด้วยกดปุ่ม Feed 4 ครั้งติดต่อกัน (4 Time)
3 ปล่อยทั้งหมด แล้วจะได้ยินเสียงกลไกทํ างาน
สรุปการ ทดสอบตัวเอง (Self Test)
เครื่องพิมพ์อิ้งค์เจ็ท (Ink Printer)
HP รุ่นมีปุ่มควบคุม 1 ปุ่ม(มีปุ่ม Power อย่างเดียวเช่นรุ่น HP Desk jet 3xxx ให้ปฏิบัติดังนี้วิธีที่ 1
1 เปิดเครื่องพิมพ์ (On Power) รอให้เครื่อง Ready (พร้อมที่จะทํ างาน ไฟแสดงผลจะมีสีเขียวติดค้าง)
2 กดปุ่ม Power ค้างไว้
3 ปิดเปิดฝาครอบ 4 ครั้งติดต่อกัน
4 แล้วปล่อยปุ่ม Power
สรุปการ ทดสอบตัวเอง (Self Test)
เครื่องพิมพ์อิ้งค์เจ็ท (Ink Printer)
LEXMARK รุ่นมีปุ่มควบคุม 2 ปุ่ม ให้ปฏิบัติดังนี้
วิธีที่ 1
1 ปิดเครื่องพิมพ์ (Off Power)
2 กดปุ่ม Feed ค้างไว้
3 เปิดเครื่อง (On Power)
4 แล้วปล่อยปุ่มทั้งคู่
วิธีที่ 2
1 กดปุ่ม Power และ ปุ่ม Feed พร้อมกัน
2 ปล่อยปุ่มทั้งคู่LEXMARK รุ่นมีปุ่มควบคุม 1 ปุ่ม ให้ปฏิบัติดังนี้
1 ถอดปลั๊ก Power Ac.
2 กดปุ่ม Power Bottom ค้างไว้ แล้วเสียบปลั๊ก Power Ac.
3 ปล่อยปุ่ม Power Bottom
วิธีเคลียร์ซับหมึก S400sp

1. ปิดเครื่อง
2. กดปุ่ม Stop/Reset ค้างไว้ และตามด้วยปุ่ม ON/OFF ค้างตาม
3. ในขณะที่ยังกดปุ่ม ON/OFF ค้างอยู่ ให้ปล่อยมือจากปุ่ม Stop/Reset
4. ยังกดปุ่ม ON/OFF ค้างอยู่ ให้กดปุ่ม Stop/Reset อีก 2 ครั้ง เสร็จแล้วปล่อยมือจากปุ่มทั้ง 2 ปุ่ม
5. ไฟสีเขียวจะกระพริบสักพักแล้วจะหยุด
6. เมื่อไฟกลายเป็นสีเขียวค้าง กดปุ่ม Stop/Reset 4 ครั้ง
7. กดปุ่ม ON/OFF เพื่อปิดปริ๊นท์เตอร์ (บางทีอาจต้องกด 2 ครั้ง เพื่อปิด)
8. เปิดปริ๊นท์เตอร์ ก็จะใช้งานได้ตามปกติ
อย่าลืมเอาเปลี่ยนที่ซับหมึกด้วยนะครับ เด๋วหมึกจะท่วมเครื่องซะก่อน
Reset cannon
Reset cannon
Reset ip2000 / 3000
1. Turn off printer
2. Hold down Resume button and press Power button.
3. Keep holding down Power button and let Resume button go.
4. Press Resume button 2 times then let BOTH buttons go.
5. Green lights will flash and then stop blinking.
6. When green lights are solid, press the Resume button 4 times.
7. Press the Power button and the printer should turn off, if not,
press the Power button once more.
8. Your printer should respond as normal..
Reset MP110
1)Enter SERVICE MODE By pressing Menu-Scan-Copy-Scan
2) Enter NVRAM by presing <--- or ---> then OK
3) Enter CMY ink level by pressing <--- or ---> then OK
4) Select 1 by presing <--- or ---> then OK
5) Enter K ink level by presing ---> then OK
6) select 1 by presing <--- or ---> then OK
7) Press reset ( design: // )
8) หลังจากทำขั้นตอนดังกล่าวเสร็จแล้ว ให้เลือกมาตรง SERVICE MENU COUNTER ACCESS
ให้ไปปรับค่า PRINT PAGE COUNT กับ SCAN PAGE COUNT ให้เหลือค่าเป็น 0
++++++++++++++++++++++++++++++++++++++++++++++++++
Canon PIXMA iP1000
Waste Ink Counter Reset Manual for Service mode
1. Turn off the printer. And disconnect the printer cable.
2. Press and hold the POWER button, turn on the printer.
3. The indicator (L.E.D.) should be green.
4. Press and release the RESUME button , the indicator (L.E.D.) should be orange.
5. Press and release the RESUME button again, the indicator (L.E.D.) should be green.
6. Release both buttons.
++++++++++++++++++++++++++++++++++++++++++++++++++
Canon PIXMA iP1500
Waste Ink Counter Reset. Manual for Service mode
1. Turn off the printer. And disconnect the printer cable.
2. Press and hold the POWER button, turn on the printer.
3. The indicator (L.E.D.) should be green.
4. Press and release the RESUME button , the indicator (L.E.D.)
should be orange.
5. Press and release the RESUME button again, the indicator
(L.E.D.) should be green
6. Release both buttons
++++++++++ ++++++++++ ++++++++++ ++++++++++ ++++++++++
Canon i320, i255
Waste Ink Counter Reset.
Step 1 : Manual Temporary
1. Unplug power and USB.
2. Open door and hold power button.
3. Connect power.
4. Close door, then release power button.
or Step 1: Manual Temporary
1. Turn off the printer. And disconnect the printer cable.
2. Press and hold the POWER button, turn on the printer.
3. The indicator (L.E.D.) should be green.
4. Press and release the RESUME button , the indicator (L.E.D.) should be orange.
5. Press and release the RESUME button again, the indicator (L.E.D.) should be green.
6. Release both buttons.
step 2 : Software for Permanant
1. Reconnect the printer cable.
2.Open General Tools software and select (USB PORT)
3 .Choose (SET DESTINATION 1) And it should be reset.
Remark "After service mode Pls use software for permanent reset"
++++++++++ ++++++++++ ++++++++++ ++++++++++ ++++++++++
Canon GENERIC "S" SERIES RESET CODE
Waste Ink Counter Reset.
(1) Turn off the printer.
(2) Press and hold the RESUME button, then press and hold the POWER button.
(3) Release the RESUME button, Next press and release the RESUME button two(2) more times in
succession. Note: you are still holding the POWER button). The printer''s carriage will "reset"
or move momentarily. If the above was properly performed the printer will enter the
"Service Mode".
(4) Press the RESUME button 4 times, this will select the clear waste ink counter function. The lamp
will alternate (change) color with each key press.
1. Service/Factory test printout, including ink sensor check.
2. EEPROM - Info printout.
3. EEPROM - Initialization.
4. Reset the Waste ink counter.
5. Printer model setting. (More selections beyond this point - However it is best leave them unaltered - You have been warned!)
After selecting the desired mode (eg 4), press the POWER button to "set" the change, and return to the top of the function selection menu. Press the POWER button again to restart the printer.
++++++++++
Canon i850, i950, S600
Start with the printer OFF
1. Hold down RESUME and then hold down POWER
2. release RESUME
3. press RESUME twice, then release POWER
4. Let green light blink until printer is done futzing
Select function with RESUME press POWER to execute:
presses - light color - function
Number of presses - light color - function
0 presses - green - Test print (or exit service mode on i960)
1 press - orange - EEPROM info print (plus grid nozzle diagnostic on i960)
2 presses - green - EEPROM initialize
3 presses - orange - Reset waste ink counter
++++++++++
Canon S450 Printer
1: Power off printer
2: Hold Resume button then press and hold POWER, the beeper will sound once.
3: Hold POWER and release RESUME
4: Press RESUME twice
5. Release Power button
6: When the indicator lights steady, press RESUME three(3) times. The indicator should be orange.
7: Press Power to set data
++++++++++
Canon BJC 1000 Serie
1: Remove Cartridge
2: Unplug the AC Power Cord
3: Hold down the RESUME button
4: Release RESUME after plugging in the AC Power cord.
5: Press the RESUME once within 5 seconds and release the RESUME .
6: Press and HOLD RESUME for two seconds or more and release it.
7: Press and HOLD RESUME for two seconds or more and release it.
8: Unplug AC Power Cord to set data.
++++++++++
Canon BJC-2000 BJC-2100 Serie
1: Remove the Cartridge
2: Unplug the AC Power Cord
3: Close Front access panel
3: Hold down the RESUME/RESET button and plug in the AC power cord
4: Release RESUME/RESET after plugging in the AC Power cord.
5: Press the RESUME/RESET once within 5 seconds and release the RESUME/RESET .
6: Press and HOLD RESUME/RESET for two seconds or more and release it.
7: Press and HOLD RESUME/RESET for two seconds or more and release it.
8: Unplug AC Power Cord to set data.
++++++++++
Canon BJC-210 BJC-240 BJC-250 BJC-255 BJC-265
Canon BJC-4100 BJC-4200 BJC-4300 BJC-4400 BJC-4550 BJC-4650
Unplug Power Cord
Hold POWER and RESUME buttons
Plug in Power Cord
Release buttons
Open front door of printer
Hold the CARTRIDGE and RESUME buttons
Press POWER
Release all buttons after the beeps
Press CARTRIDGE once
Press RESUME
++++++++++
Canon BJC-5000
1: Power off printer
2: Press and hold RESUME then press POWER, The indicator will start blinking.
3: While the indicator is blinking , Press RESUME twice then Wait until the printer beeps to indicate service mode
5: When the indicator lights steady GREEN, press RESUME four(4)times. The indicator should be GREEN.
6: Press Power to set data
Service Test Print
1: Power off printer
2: Press and hold RESUME then press POWER, The indicator will start blinking.
3: While the indicator is blinking , Press RESUME twice then Wait until the printer beeps to indicate service mode
5: When the indicator lights steady GREEN, press RESUME two(2)times. The indicator should be GREEN.
6: Press Power to Print
Nozzle Print
1: Power off printer
2: Press and POWER, until the printer beeps and release.
Demonstration Print
1: While the printer in ON , , Press and hold RESUME until the printer plays a melody of beeps.
++++++++++
Canon BJC-5100
Self Test
Switch Printer off. Hold Power for 1 beep.
Waste Counter Reset
1: Power off printer
2: Press and hold RESUME then press POWER, The indicator will start blinking.
3: While the indicator is blinking , Press RESUME twice then Wait until the printer beeps to indicate service mode
5: When the indicator lights steady GREEN, press RESUME four(4)times. The indicator should be GREEN.
6: Press Power to set data
Service Test Print
1: Power off printer
2: Press and hold RESUME then press POWER, The indicator will start blinking.
3: While the indicator is blinking , Press RESUME twice then Wait until the printer beeps to indicate service mode
5: When the indicator lights steady GREEN, press RESUME two(2)times. The indicator should be GREEN.
6: Press Power to Print
Nozzle Print
1: Power off printer
2: Press and POWER, until the printer beeps and release.
Demonstration Print
1: While the printer in ON , , Press and hold RESUME until the printer plays a melody of beeps.
++++++++++
Canon BJC-3000 BJC-6000 BJC-6100 BJC-6200 S400 S450 F300 F600 F620
Canon BJC-7000 BJC-7100 BJC-8000 BJ-F800 i6500
1: Power off printer
2: Hold Resume button then press and hold POWER, the beeper will sound once.
3: Hold POWER and release RESUME
4: Press RESUME twice
5: When the indicator lights steady, press RESUME three(3) times. The indicator should be orange.
6: Press Power to set data
++++++++++
Canon BJC-600 BJC-600e BJC-610 BJC-620
1: Unplug Power Cord
2: Hold POWER and FF and Print Mode buttons
3: Plug in Power Cord
4: Release after the beeps
++++++++++
Canon BJC-50 BJC-55 BJC-80 BJC-85 M40 M70
1: Unplug Power Cord
2: Hold POWER and RESUME buttons
3: Plug in Power Cord
4: Release buttons after the printers starts up
5: Hold CARTRIDGE and RESUME
6: Press POWER
7: Release all buttons after the beeps
8: Press CARTRIDGE 16 times
9: Press RESUME
10: Unplug the Power cord
++++++++++
Canon BJ-30 BJC-35v BJC-70
F14 Error Reset
1: Unplug adapter
2: Hold POWER
3: Plug in ADAPTER
4: Release POWER after printer starts
5: Hold FF and MENU and press POWER
6: Release after beeps
7: Press <> Cartridge until 1A is displayed
8: Press ONLINE
9: Press POWER to shutoff printer
10: Unplug printer then re-plug printer
++++++++++
Canon BJ F900, F890, F700, F500, S900, S820, S750 and S520
Turn off the printer.
Press and hold the RESUME button, then press and hold the POWER button.
Release the RESUME button, then press and release the RESUME button two more times in succession. (youre still holding the POWER button during this). The printer mechanics will move momentarily.
You are now in Service mode.
Pressing the RESUME key will select a function; for example, pressing RESUME 4 times will select the clear waste ink counter function. The lamp will alternate color with each key press.
1. service/factory test printout, including ink sensor check
2. EEPROM info printout
3. EEPROM initialization
4. Clear the waste-ink counter
5. Printer model setting. (more selections beyond this- leave this alone)
After selecting mode, press the POWER button to commit the change, and return to the top of the function selection menu. Pressing the POWER button again turns off the printer for a resta
++++++++++
Canon S9000, S300, S400, i550, i560, i850, i860, i865, i9100, i9950, PIXMA IP3000 above,
1. Turn off printer
2. Hold down Resume button and press Power button.
3. Keep holding down Power button and let Resume button go.
4. Press Resume button 2 times then let BOTH buttons go.
5. Green lights will flash and then stop blinking.
6. When green lights are solid, press the Resume button 4 times.
7. Press the Power button and the printer should turn off, if not, press the Power button once more.
8. Your printer should respond as normal.
+++++++++
Canon S900, S820, S750, S520
1. Turn off the printer.
2. Press and hold the RESUME button, then press and hold the POWER button.
3. While still holding the POWER button, Release the RESUME button, then press and release the RESUME button two more times in succession.
4. The printer mechanics will move momentarily. You are now in Service mode. Release the Power Button.
5. Pressing the RESUME key will select a function; for example, pressing RESUME 4 times will select the clear waste ink counter function. The lamp will alternate color with each key press.
1. Service/factory test printout, including ink sensor check
2. EEPROM info printout
3. EEPROM initialization
4. Clear the waste-ink counter
5. Printer model setting. (more selections beyond this- leave this alone)
6. After selecting mode, press the POWER button to commit the change, and return to the top of the function selection menu. Pressing the POWER button again turns off the printer for a restart.
++++++++++
Canon S9000
1. Turn off printer
2. Hold down Resume button and press Power button.
3. Keep holding down Power button and let Resume button go.
4. Press Resume button 2 times then let BOTH buttons go.
5. Green lights will flash and then stop blinking.
6. When green lights are solid, press the Resume button 4 times.
7. Press the Power button and the printer should turn off, if not, press the Power button once more.
8. Your printer should respond as normal.
+++++++++
Canon MPC190
Reset Waste Ink
1) Enter SERVICE MODE.
By pressing Menu Copy Scan Copy Copy
2) Select TEST MODE.
3) Select [8] PRINTER TEST in TEST MODE.
4) Select 3. [EEPROM CLEAR].
5) Select 0. [INK COUNT].
6) Press the [Set] key.
7) Press the [Stop/Reset] key (returning to the state of 3)), and then press the [ON/OFF] key
สมัครสมาชิก:
บทความ (Atom)